Fumino: Personal virtual bookshelf of mangas
Background
As a big fan of the anime/manga culture, for the last few years, I have pursued a hobby of collecting raw Japanese manga volumes. Not only this would be the best way for me to support the authors of my favorite mangas, but reading the original version of these titles will also give me a much more authentic experience than reading the translated versions. These books will also serve as valued materials for improving my Japanese reading skill.
However, as the collection kept growing, it's getting harder and harder for me to keep track of all the books that I have purchased and those that I wish to purchase in the future. As a problem solver at heart, this led me to create a web application serving as a virtual bookshelf logging all of my bought & to-be-bought mangas. 😤 This article will be the detailed case study of the application, where we will dive deep into how the app was built.
Technology Stack
For this application, I decided to use my bread and butter for web development. The core tech stack comprises:
- React
- Babel & Webpack
- Typescript
- Netlify
Besides the core stack, interesting packages being used inside the app will be revealed in the following sections to avoid spoilers. 😏
Data Source
So before we even begin to develop the app, we first need to define our data source for the app. As the app is aimed to be a personal database for my manga collection, the main data here will simply be a list of book entries where each entry will provide basic information about a manga volume such as title, author, publisher, etc.
export type Book = {
  // Link to the book website being used for book's reference
  url: string;
  // Title of the book
  title: string;
  // Caption of the book including publisher, author, etc.
  caption: string;
  // List of preview images where thumbnail will be the first image
  imageURLs: string[];
  // Width of the thumbnail
  imageWidth: number;
  // Height of the thumbnail
  imageHeight: number;
};

export type BookDatabase = {
  books: {
    wanted: Book[];
    purchased: Book[];
  }
}
For the technology to be used for the data source, since the data will only be for my personal use and the number of book entries will not be at an extremely large scale, using a full-fledged database like PostgreSQL or MySQL will be unnecessary.
Instead, we can just simply use a static JSON file as the data source and import it into the app JS bundle. Every time new entries are added to the JSON file and deployed, the JS bundles will be recompiled and the app will automatically reflect the changes.
Scraper
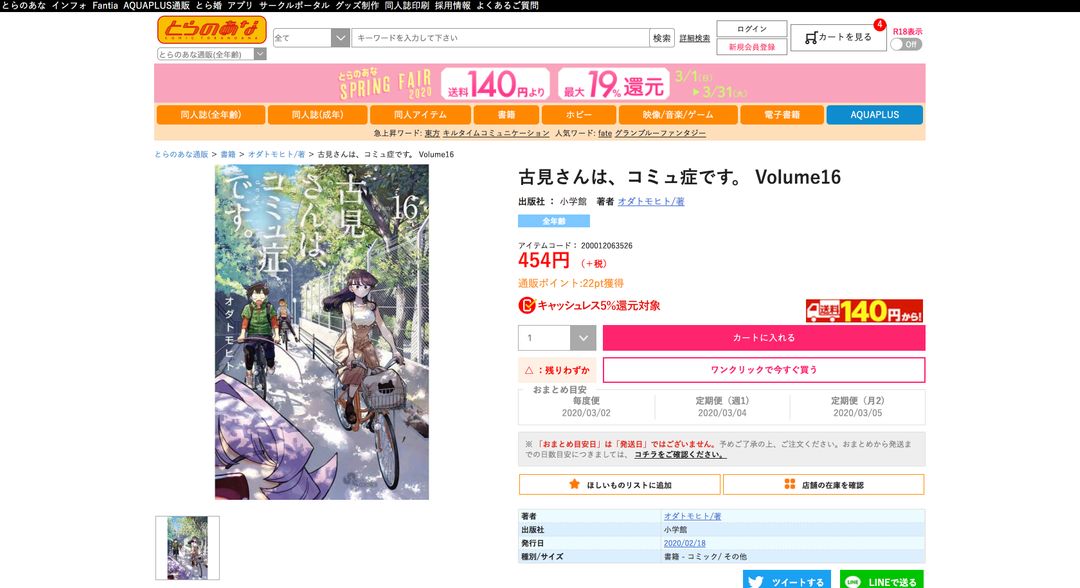
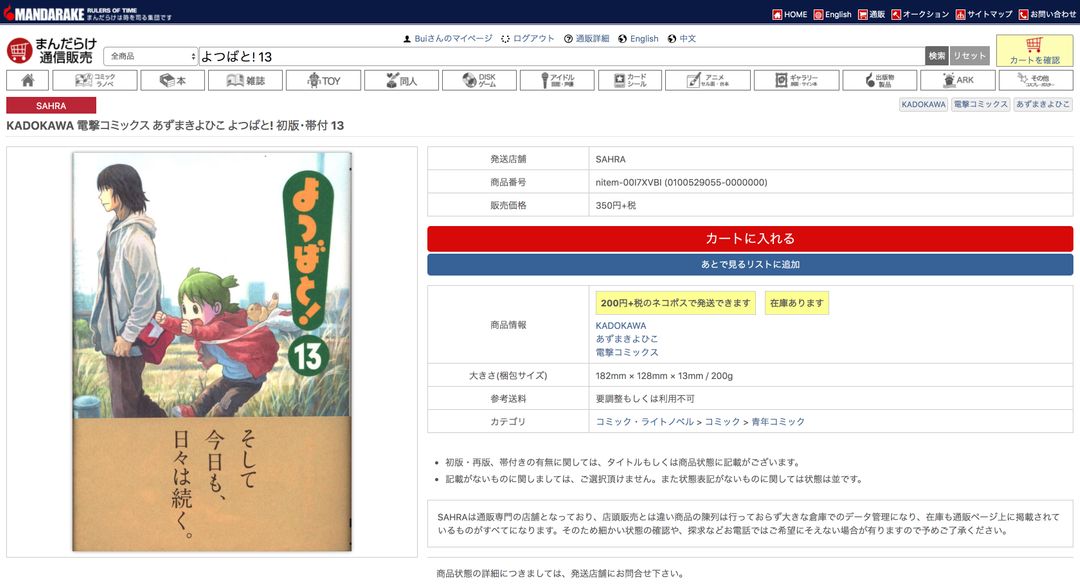
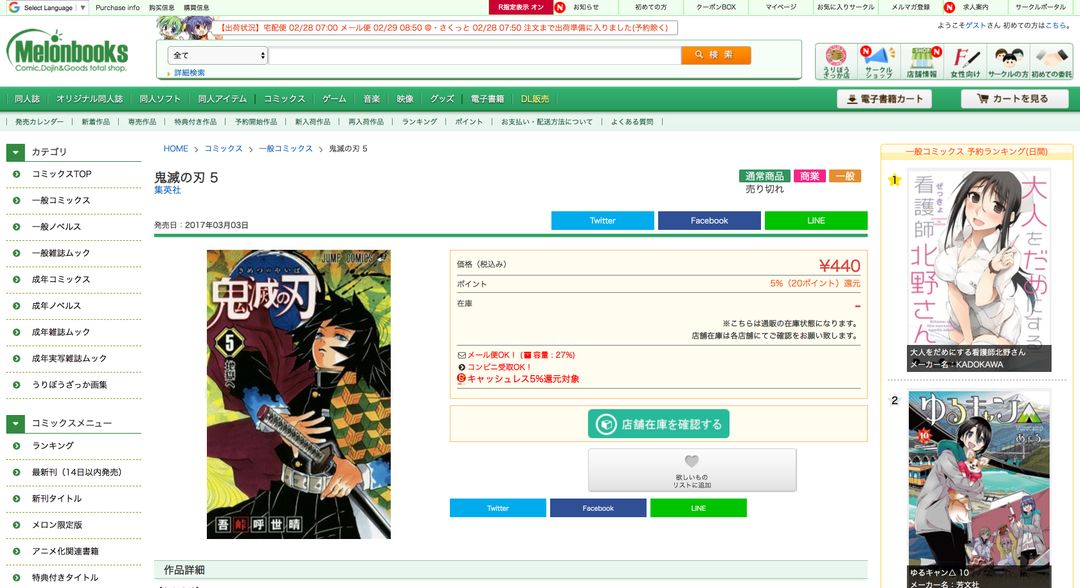
So with the data source being defined as a JSON file, the next question is how we are going to collect data for each book entry to put into the JSON file? Each manga book information can be found under popular online manga bookstores such as AmazonJP, Mandarake, Toranoana, Melonbooks, etc.
A naive approach is after finding the book page in one of the sites above, we can then manually scan through the website to extract out the information we need. This will work but it will also waste a lot of time when we are talking about adding hundreds of entries into the JSON file.
Instead of doing this manual and repetitive process, we can create a scraper that will scrape the required information when we pass a book URL to it. The book URL will be from the sites we mentioned before i.e AmazonJP, Mandarake, Toranoana and Melonbooks.
The scraper will need to run on a non-browser environment since the CORS (Cross-Origin Resource Sharing) settings on the book sites will prevent the browser from accessing the page content. Hence, we will implement the scraper in NodeJS instead. The main entry function of the scraper will first detect the origin of the book URL so it can choose the correct method to scrape the book site:
const ALLOWED_HOSTNAMES = [
  // Toranoana host names
  "ec.toranoana.jp",
  "ec.toranoana.shop",
  // Melonbooks host names
  "melonbooks.co.jp",
  "www.melonbooks.co.jp",
  // Mandarake host names
  "order.mandarake.co.jp",
  // Amazon host names
  "amazon.co.jp",
  "www.amazon.co.jp",
];

async function scrapeToranoana(bookURL) {
  // ...
}

async function scrapeMelonbooks(bookURL) {
  // ...
}

async function scrapeMandarake(bookURL) {
  // ...
}

async function scrapeAmazon(bookURL) {
  // ...
}

async function scrape(bookURL) {
  const { hostname } = new URL(bookURL);
  if (!ALLOWED_HOSTNAMES.includes(hostname)) {
    throw new Error("Book URL is not suppoted");
  }

  let scrapedData = {};
  if (hostname.includes("toranoana")) {
    scrapedData = await scrapeToranoana(bookURL);
  } else if (hostname.includes("melonbooks")) {
    scrapedData = await scrapeMelonbooks(bookURL);
  } else if (hostname.includes("mandarake")) {
    scrapedData = await scrapeMandarake(bookURL);
  } else if (hostname.includes("amazon")) {
    scrapedData = await scrapeAmazon(bookURL);
  }

  return scrapedData;
}
As defined in the data source above, for each manga page, what we want to scrape are title, publisher, author and list of preview image URLs. Since most of the online bookstores have their page content fully rendered on the server-side, there will be no need for the scraper to parse and run the JS bundles on the page in order to load the content. Hence, the scraping process can just be split into two main steps:
- Fetch the page HTML. We will use the HTTP request library got to achieve this in NodeJS.
- Parse the page HTML and extract content from specific elements. We will use cheerio - a jQuery alternative library for NodeJS to accomplish this.
Toranoana ec.toranoana.jp/tora_r/ec/item/:id/
For Toranoana, since the page content is fully server-side rendered, scraping for information is fairly straightforward.
const got = require("got");
const cheerio = require("cheerio");

async function scrapeToranoana(bookURL) {
  // Fetch the page HTML and let cheerio parse the HTML
  const response = await got(bookURL);
  const $ = cheerio.load(response.body);

  // Scrape preview images
  const imageURLs = [];
  $("#thumbs .item").each(function() {
    imageURLs.push(
      $(this)
        .find("img")
        .data("src"),
    );
  });

  // Scrape title
  const title = $(".product-info h1 span")
    .text()
    .trim();

  // Scrape caption
  const circle =
    $(".sub-circle div").eq(1) != null
      ? $(".sub-circle div")
          .eq(1)
          .text()
          .trim()
      : "";
  const author =
    $(".sub-name div").eq(1) != null
      ? $(".sub-name div")
          .eq(1)
          .text()
          .trim()
      : "";
  const caption = [circle, author]
    .filter(s => s.length > 0)
    .join(" / ");

  return {
    imageURLs,
    title,
    caption,
  };
}
Mandarake order.mandarake.co.jp/order/detailPage/item?itemCode=${id}
For Mandarake, the page content is also fully server-side rendered. The only caveat is that the HTML structure for the preview images section will be different between the case of one single image and multiple images.
const got = require("got");
const cheerio = require("cheerio");

async function scrapeMandarake(bookURL) {
  // Fetch the page HTML and let cheerio parse the HTML
  const response = await got(bookURL);
  const $ = cheerio.load(response.body);

  // Scrape preview images
  const imageURLs = [];

  // When there are multiple preview images
  if ($(".xzoom-thumbs img").length > 0) {
    $(".xzoom-thumbs img").each(function() {
      imageURLs.push($(this).attr("src"));
    });
  } else {
    imageURLs.push($(".pic img").attr("src"));
  }

  // Scrape title
  const title = $(".content_head h1")
    .text()
    .trim();

  // Scrape caption
  const circle =
    $(".status table em").eq(0) != null
      ? $(".status table em")
          .eq(0)
          .text()
          .trim()
      : "";
  const author =
    $(".status table em").eq(1) != null
      ? $(".status table em")
          .eq(1)
          .text()
          .trim()
      : "";
  const caption = [circle, author]
    .filter(s => s.length > 0)
    .join(" / ");

  return {
    imageURLs,
    title,
    caption,
  };
}
Melonbooks melonbooks.co.jp/detail/detail.php?product_id=${id}
For Melonbooks, even though the page content is also fully rendered on the server-side, there are some gotchas which we need to handle.
First, for all preview images, since Melonbooks is using Akamai as their media CDNs, it allows the web application to request for image with indicated width and height in URL query for optimization, e.g., https://melonbooks.akamaized.net/user_data/packages/resize_image.php?image=211000104882.jpg&width=450&height=450. So for us to get the original quality of the image, the scraper will need to remove the query params width and height.
Secondly, for some book pages coming with age restrictions, Melonbooks will require users to confirm whether they want to display it or not beforehand. Hence, the initial HTML for the page will come with no content but only a prompt instead.
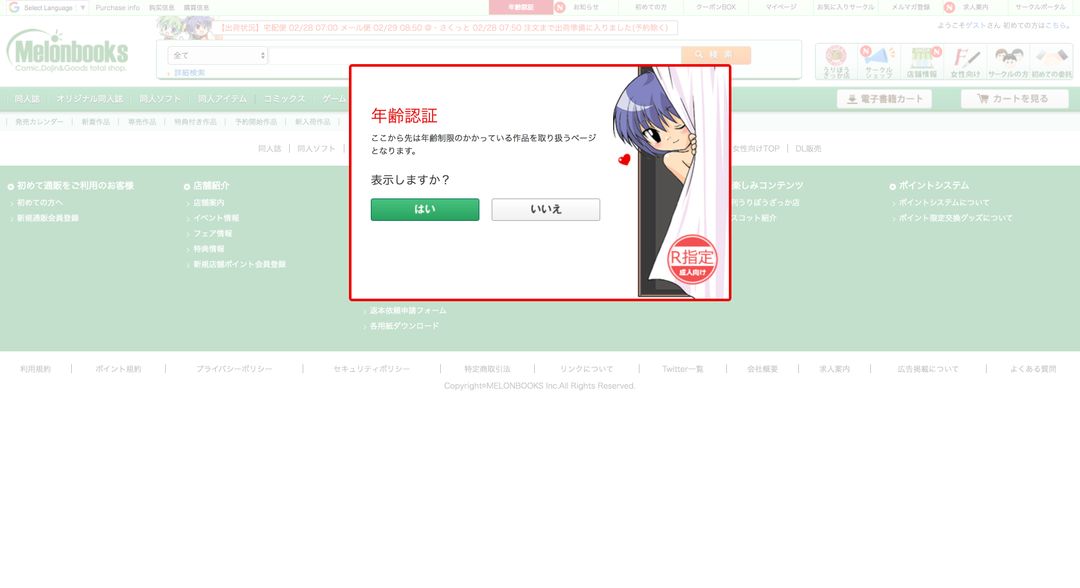
After investigating how Melonbooks differentiates between users who have already confirmed or not before, it appears that Melonbooks is checking by looking at the Cookie field AUTH_ADULT. If the cookie field is there, users will be assumed that they have already confirmed before. Hence, we just need to put the appropriate Cookie header when we send the request from the scraper for page HTML content.
const got = require("got");
const cheerio = require("cheerio");

async function scrapeMelonbooks(bookURL) {
  // Fetch the page HTML and let cheerio parse the HTML
  const response = await got(bookURL, {
    headers: {
      cookie: "AUTH_ADULT=1",
    },
  });
  const $ = cheerio.load(htmlString);

  // Scrape preview images
  const imageURLs = [];

  // Extract main thumbnail image
  $("#main .thumb").each(function() {
    const thumbnailURL = $(this)
      .find("img")
      .attr("src");
    imageURLs.push(
      `https:${thumbnailURL.slice(
        0,
        thumbnailURL.indexOf("&width"),
      )}`,
    );
  });

  // Extract other thumbnails
  $("#thumbs .thumb").each(function() {
    const thumbnailURL = $(this)
      .find("img")
      .attr("src");
    imageURLs.push(
      `https:${thumbnailURL.slice(
        0,
        thumbnailURL.indexOf("&width"),
      )}`,
    );
  });

  // Scrape title
  const title = $("#title h1")
    .text()
    .trim();

  // Scrape caption
  const circle =
    $("#description table tr").eq(1) != null
      ? $("#description table tr")
          .eq(1)
          .find("td a")
          .eq(0)
          .text()
          .trim()
      : "";
  const author =
    $("#description table tr").eq(1) != null
      ? $("#description table tr")
          .eq(2)
          .find("td a")
          .eq(0)
          .text()
          .trim()
      : "";
  const caption = [circle, author]
    .filter(s => s.length > 0)
    .join(" / ");

  return {
    imageURLs,
    title,
    caption,
  };
}
Amazon amazon.co.jp/dp/:id/
For AmazonJP, the page content is majorly rendered on the server-side except for the preview images. On the client-side, preview images are dynamically injected by an inline script where the list of image URLs are declared inside. Hence, we can do some regex pattern matching to extract this list of image URLs from the JS snippet. The inline script snippet is as follow:
P.when("A").register("ImageBlockATF", function(A) {
  var audibleData = {};
  if (false) {
    audibleData = {
      audioSampleSrc: "",
      flashPlayerUrl: "",
    };
  }
  var data = {
    litbData: {
      hasLitb: true,
      litbReftag: "sib_dp_pt",
    },
    audibleData: audibleData,
    windowWidthThreshold: 1150,
    configWidths: [200, 260],
    holderRatio: 0.75,
    containerMargin: 15,
    flipLinkMinHeight: 0,
    frontImageWidth: 244,
    frontImageHeight: 346,
    frontImageAspectRatio: 0.7052023121387283,
    imageGalleryData: [
      {
        mainUrl:
          "https://images-na.ssl-images-amazon.com/images/I/81EKvVvreqL.jpg",
        dimensions: [1056, 1500],
        thumbUrl:
          "https://images-na.ssl-images-amazon.com/images/I/81EKvVvreqL._AC_SX75_CR,0,0,75,75_.jpg",
      },
    ],
    centerColMargin: 40,
    disableResize: false,
  };
  return data;
});
Another problem we have here is the same as the problem in Melonbooks. For some book pages coming with age restrictions, AmazonJP will require users to confirm whether they want to display it or not beforehand. Hence, the initial HTML for the page will come with no content but only a prompt instead.

For AmazonJP case, they did not record user's confirmation as simply as Melonbooks where they just check for the cookie field AUTH_ADULT. Instead, AmazonJP will update the record of user confirmation on the server-side based on the user's session ID. Hence, instead of forging the cookie string like before, we need to come up with a different approach. Thankfully, by inspecting the URL from the Yes link in the confirmation prompt, we realized that accessing this URL directly will make Amazon automatically update the user's confirmation and return the fully rendered page content. The URL is in this format http://www.amazon.co.jp/gp/product/black-curtain-redirect.html?redirectUrl=%2Fgp%2Fproduct%2F${productID}. So what we need to do here is to just extract out the ID from the original book URL and use this confirmation URL directly as the request for page content instead.
const got = require("got");
const cheerio = require("cheerio");
const { match: pathMatch } = require("path-to-regexp");

async function scrapeAmazon(bookURL) {
  // Fetch the page HTML and let cheerio parse the HTML
  const parsedBookURL = new URL(bookURL);
  const productPathMatch = pathMatch("/dp/:bookID", {
    decode: decodeURIComponent,
  });
  const match = productPathMatch(parsedBookURL.pathname);
  if (match == null) {
    throw new Error(
      "Amazon URL is not a product URL path i.e /dp/:productID",
    );
  }
  const {
    params: { bookID },
  } = match;
  const response = await got(
    `https://www.amazon.co.jp/gp/product/black-curtain-redirect.html/?redirectUrl=%2Fgp%2Fproduct%2F${bookID}`,
  );
  const $ = cheerio.load(response.body);

  // Scrape preview images
  let imageURLs = [];
  const scriptContent = $("#imageBlockOuter")
    .next()
    .html();
  if (scriptContent != null) {
    const match = scriptContent.match(
      /\[\{"mainUrl":(.*)\]/,
    );
    if (match != null) {
      const imagesJSON = JSON.parse(match[0]);
      imageURLs = imagesJSON.map(image => image.mainUrl);
    } else {
      throw new Error(
        "Failed to extract thumbnail images for this Amazon book",
      );
    }
  }

  // Scrape title
  const title =
    $("#productTitle")
      .text()
      .trim();

  // Scrape caption
  const caption =
    $("#bylineInfo > span > span > a")
      .eq(0)
      .text()
      .trim() ||
    $("#bylineInfo > span > a")
      .eq(0)
      .text()
      .trim();

  return {
    imageURLs,
    title,
    caption,
  };
}
Netlify CMS
So with the scraper completed, the next question is how we are going to use the scraper? One straightforward approach is to create a CLI (Command Line Interface) for the scraper. The command will have 2 main arguments url for the book's URL and purchased as a flag to indicate whether the book is for wishlist or purchased list. After successfully scraping for the book's information, the command will automatically append the book entry to the appropriate list in the data source JSON file.
However, while managing the data source, besides adding a new entry, there are still other features we want to have, which will still require us to touch the JSON file directly such as:
- Update information of some existing entry
- Reorder book entries in the list
- Move a book from wishlist to purchased list or vice versa
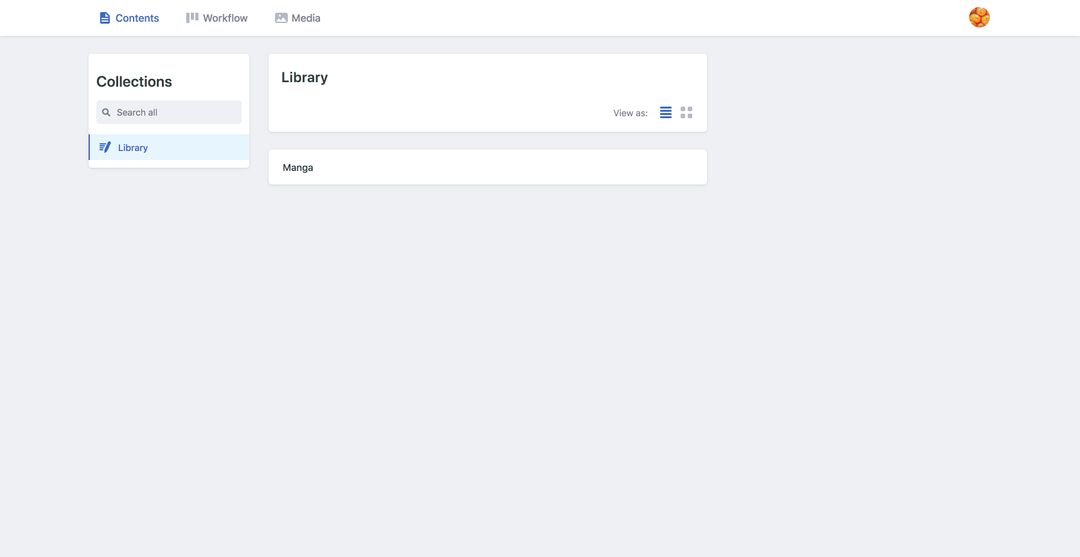
But when the JSON file contains more than hundreds of entries, manual editing the JSON file can be extremely frustrating and easily create unnoticed errors. Instead, what if we have a much more intuitive CMS (Content Management System) for us to manage the book entries. Then, whatever we update to the book entries through the UI of the CMS will be automatically reflected in the data source JSON file. That is where Netlify CMS comes in.
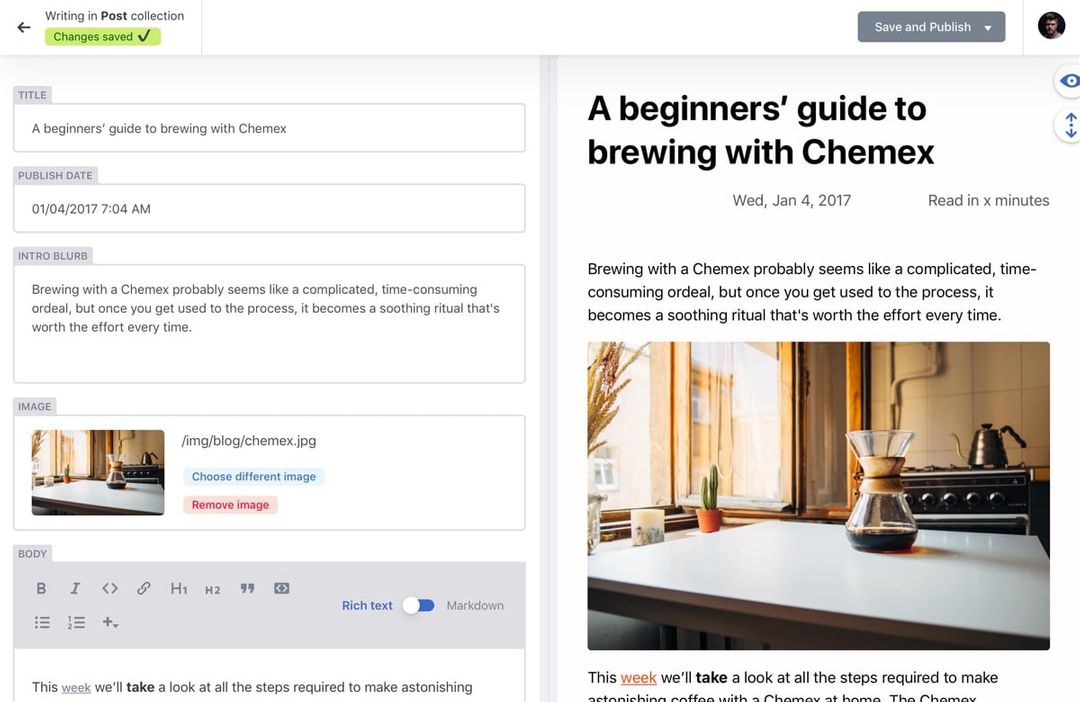
Netlify CMS is an open source content management system for your Git workflow that enables you to provide editors with a friendly UI and intuitive workflows. You can use it with any static site generator to create faster, more flexible web projects. Content is stored in your Git repository alongside your code for easier versioning, multi-channel publishing, and the option to handle content updates directly in Git.
At its core, Netlify CMS is an open-source React app that acts as a wrapper for the Git workflow, using the GitHub, GitLab, or Bitbucket API. If you hook up Netlify CMS to your website, you're basically adding a tool for content editors to make commits to your site repository without touching code or learning Git.
Hence, by using Netlify CMS, we will able to create an interface for us to flexibly edit the book entries without touching the data source JSON file directly. Every time we submit the changes in the Netlify CMS, it will then apply the corresponding changes to the JSON file, commit and push the changes to the Git repository hosted on GitHub for us. Netlify will then automatically deploy the new commit for us and the changes to the book entries will eventually be reflected in our application. 😎
Setting up Netlify CMS is super straightforward. At the root of our published site, we will need to host a static admin folder containing all of our necessary Netlify CMS files. There are 3 main files in this admin folder:
admin
 ├ index.html
 ├ index.js
 └ config.yml
The first file, ${HOSTNAME}/admin/index.html, is the entry point for the Netlify CMS admin interface. This also means that we will need to navigate to ${HOSTNAME}/admin/ to access our CMS. The HTML file is just a basic HTML starter page that loads the entry JS bundle ${HOSTNAME}/admin/index.js. The config file ${HOSTNAME}/admin/config.yml is where we configure all the settings and data sources for our CMS. The entry JS bundle ${HOSTNAME}/admin/index.js will then load the config file and initialize the admin CMS.
HTML & JS entry files
Since we are using Webpack to compile our main application, we will also use Webpack to compile the HTML and JS entry files of our CMS. For our main application, Webpack will compile and output all the assets into the ./build/ folder in the repository. This ./build/ folder will then be deployed to Netlify and serve as the root of the published site. Hence, we need to configure Webpack to compile and output the entry files for the CMS to ./build/admin/ according to what we mentioned above. All the source files for CMS will be put under ./admin/ folder
./admin/index.html
<!DOCTYPE html>
<html lang="en">
  <head>
    <meta charset="utf-8" />
    <meta http-equiv="X-UA-Compatible" content="IE=edge" />
    <meta name="viewport" content="width=device-width, initial-scale=1.0" />
    <title><%= htmlWebpackPlugin.options.title %></title>
  </head>
  <body>
    <div id="root"></div>
  </body>
</html>
./admin/index.js
import CMS from "netlify-cms-app";

CMS.init();
./webpack/admin.config.js
// Other imports...
const CopyWebpackPlugin = require("copy-webpack-plugin");
const HtmlWebpackPlugin = require("html-webpack-plugin");
const path = require("path");

module.exports = {
  // Configure the source for JS entry file
  entry: {
    main: path.resolve(__dirname, "../admin/index.js"),
  },
  output: {
    chunkFilename: "[name]-[contenthash:10].js",
    filename: "[name]-[contenthash:10].js",
    // Configure the output folder for the assets
    path: path.resolve(__dirname, "../build/admin"),
    // Configure the published public path for the assets
    publicPath: "/admin",
  },
  plugins: [
    // Configure the output HTML entry file
    new HtmlWebpackPlugin({
      title: "Admin CMS",
      template: path.resolve(
        __dirname,
        "../admin/index.html",
      ),
    }),
    // Copy the CMS config to the build folder
    new CopyWebpackPlugin([
      {
        from: path.resolve(
          __dirname,
          "../admin/config.yml",
        ),
        to: path.resolve(__dirname, "../build/admin"),
      },
    ]),
  ],
  // Other settings...
};
Configuration config.yml
For Netlify CMS config, there are 2 required settings that we need to configure:
Backend
A backend is a Javascript code that allows Netlify CMS to communicate with a service that stores content - typically a Git host like GitHub. It provides functions that Netlify CMS can use to do things like reading and updating files using API's provided by the service. Since we are hosting our codebase on GitHub, we will configure Netlify CMS to use GitHub as its backend.
backend:
  name: github
  repo: imouto1994/fumino
Collections
The collections setting is the heart of our Netlify CMS configuration, as it determines how content types and editor fields in the CMS interface link to the files and content in the repository.
Collections come in two main types: folder and files.
-
Folder: Folder collections represent one or more files with the same format, fields, and configuration options, all stored within the same folder in the repository. You might use a folder collection for blog posts, product pages, author data files, etc.
Unlike file collections, folder collections have the option to allow editors to create new items in the collection. This is set by the boolean create field.
Example for collection folder
collections:
  - label: Blog
    name: blog
    folder: "_posts/blog"
    create: true
    fields:
      - {label: Title, name: title, widget: string}
      - {label: Publish Date, name: date, widget: datetime}
      - {label: Featured Image, name: thumbnail, widget: image}
- {label: Body, name: body, widget: markdown}-
Files: A files collection contains one or more uniquely configured files. Unlike items in folder collections, which repeat the same configuration over all files in the folder, each item in a files collection has an explicitly set path, filename, and configuration. This can be useful for unique files with a custom set of fields, like a settings file or a custom landing page with a unique content structure.
When configuring a
filescollection, configure each file in the collection separately, and list them under the files field of the collection. Each file has its own list of fields and a unique file path specified in thefilefield (relative to the base of the repo).
Example for collection files
collections:
  - label: Pages
    name: pages
    files:
      - label: About Page
        name: about
        file: "site/content/about.yml"
        fields:
          - {label: Title, name: title, widget: string}
          - {label: Intro, name: intro, widget: markdown}
          - label: Team
            name: team
            widget: list
            fields:
              - {label: Name, name: name, widget: string}
              - {label: Position, name: position, widget: string}
              - {label: Photo, name: photo, widget: image}
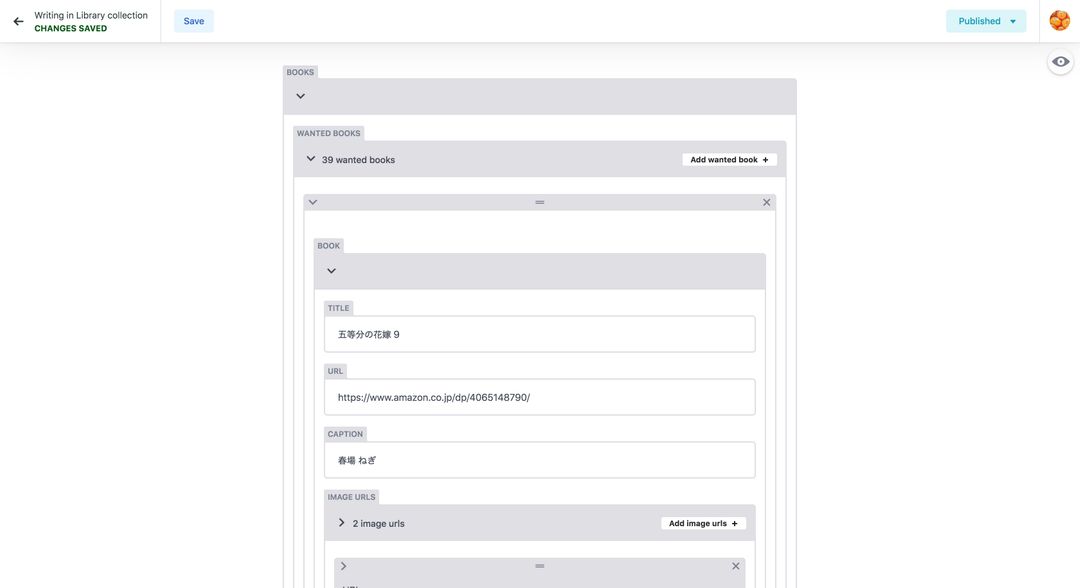
Since we only have one single data source JSON file for the CMS to edit, we will set up our collection as files collection. Previously, we have already defined the structure of our data source JSON file. Hence, by using the default widgets provided by Netlify CMS, our files collection structure can be configured like this:
collections:
  - label: Library
    name: library
    files:
      - label: Manga
        name: manga
        file: "json/manga.json"
        fields:
          - label: Books
            name: books
            widget: object
            fields:
              - label: Wishlist
                name: wanted
                widget: list
                fields:
                  - {label: Title, name: title, widget: string}
                  - {label: URL, name: url, widget: string}
                  - {label: Caption, name: caption, widget: string}
                  - label: Image URLs
                    name: imageURLs
                    widget: list
                    field: {label: URL, name: url, widget: string}
              - label: Purchased
                name: purchased
                widget: list
                fields:
                  - {label: Title, name: title, widget: string}
                  - {label: URL, name: url, widget: string}
                  - {label: Caption, name: caption, widget: string}
                  - label: Image URLs
                    name: imageURLs
                    widget: list
                    field: {label: URL, name: url, widget: string}
So with the config file completed, our admin CMS is ready to go!
However, now we have encountered the same old problem with the current CMS interface again. As we are just using the default widgets to construct the editor for the collection, we will only be able to edit the entry by manually updating the input fields. What we actually want is that the CMS should automatically add new book entries for us when we input a book URL. Manual edit on each entry will only be afterward if we deem it necessary. To achieve this, we will need to use a custom widget to construct the editor interface for the collection instead of using the default ones provided by Netlify CMS.
Netlify CMS Custom Widget
To recap, the necessary features in our CMS interface are:
- Add new book entry by providing the book URL to the CMS.
- Move book entry's position in the list.
- Tweak information of an existing entry.
- Remove book entries.
- Move book entries from wishlist to purchased list or vice versa.
All of these features will be handled by our custom widget. We will name the widget as BookShelf. A custom widget is a React component with 2 main props:
- value: Current field value
- onChange: Callback function to update the field value
To register a custom widget to Netlify CMS, we will need to update our configuration file config.yml and JS entry file ./admin/index.js:
./admin/widgets/BookShelf.js
import React from "react";

const BookShelf = props => {
  return (
    // ...
  );
};

export default BookShelf;
./admin/index.js
import CMS from "netlify-cms-app";

import BookShelf from "./widgets/BookFetch";

CMS.registerWidget("BookShelf", BookShelf);

CMS.init();
./admin/config.yml
collections:
  - label: "Library"
    name: "library"
    files:
      - label: "Manga"
        name: "manga"
        file: "json/manga.json"
        fields:
          - label: Books
            name: books
            widget: BookShelf
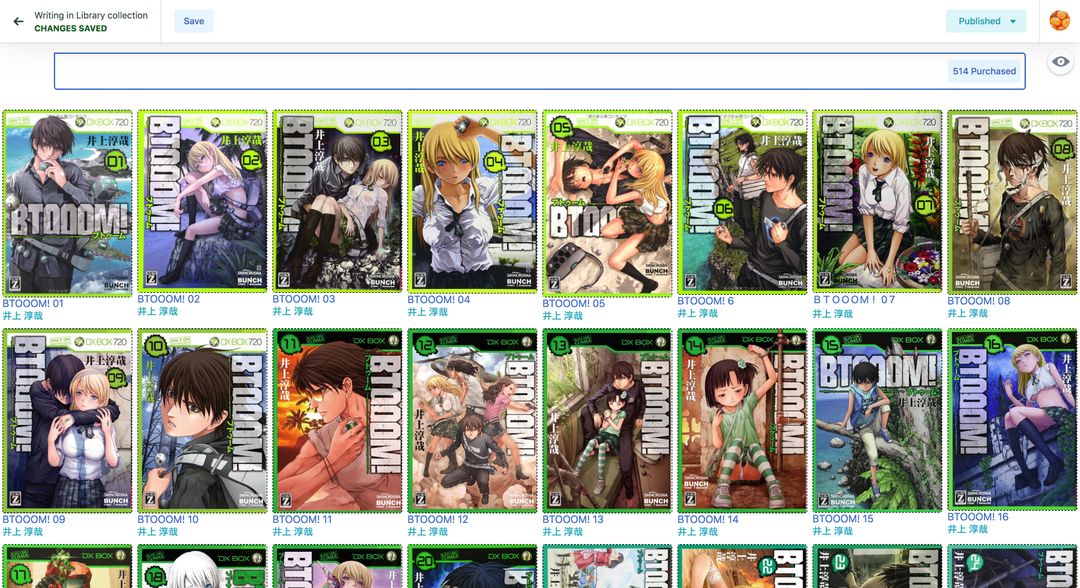
So after registering the custom widget, our next step is to implement the widget itself to support all the features we mentioned above. The final design of BookShelf widget will look like this:
- Each book entry will be represented by a card with its thumbnail, title and caption displayed.
- The input text field at the top is where users will paste the book URL and let the CMS scrape the book's information. Then, the CMS will create a new card representing the new book entry in the list
- The button nested inside the input text field will allow users to toggle between the list of wanted & purchased books.
-
Users can select multiple cards by clicking on them while holding down
Metakeys. Then, users can either:- Delete the cards
- Move the card's positions
- Move the cards to the other list
- Title and caption of each book entry are editable on the spot by just clicking on the text elements and update them
Data source
As mentioned above, a widget React component will access the data of its represented field in a collection through prop value. Since Netlify CMS is using ImmutableJS for all of their data, value will not be a native JS object. We will convert it back to native JS objects by using toJS() prototype function available in every immutable class from ImmutableJS. Then whenever we update/create/delete book entries, we will need to call prop onChange to inform Netlify CMS about the changes. Furthermore, as Netlify CMS also expects the updated value to be in immutable classes, we will need to use fromJS() to convert the native JS object back to the immutable classes.
Layout
The basic UI layout of our widget is fairly straightforward to be implemented.
import React, { useState } from "react";

import styles from "./styles.css";

const BookShelf = props => {
  // Selected list type: wanted, purchased
  const [listType, setListType] = useState("wanted");
  // Indices of all currently selected books
  const [selectedIndices, setSelectedIndices] = useState([]);
  // Current text of the input field
  const [text, setText] = useState("");

  const { value, onChange } = props;
  const books = value.toJS();
  const { wanted, purchased } = books;
  const displayedBooks = listType === "wanted" ? wanted : purchased;

  const onListToggleButtonClick = () => {
    setListType(listType === "wanted" ? "purchased" : "wanted");
  };

  const onBookDeleteButtonClick = (event, index) => {
    // ...
  };

  const onBookStatusUpdateButtonClick = (event, index) => {
    // ...
  };

  const onBookTitleChange = (event, index) => {
    // ...
  };

  const onBookCaptionChange = (event, index) => {
    // ...
  };

  const onBookSelect = (event, index) => {
    // ...
  };

  const onInputChange = event => {
    // ...
  };

  return (
    <div className={styles.container}>
      <div className={styles.inputContainer}>
        <input
          type="text"
          value={text}
          className={styles.input}
          onChange={onInputChange}
        />
        <button
          className={styles.listToggleButton}
          onClick={onListToggleButtonClick}
        >
          {listType === "wanted"
            ? `${wanted.length} Wanted`
            : `${purchased.length} Purchased`}
        </button>
      </div>
      <div className={styles.books}>
        {displayedBooks.map(({ book }, index) => {
          return (
            <div key={book.url} className={styles.book}>
              <div
                className={styles.bookThumbnailWrapper}
                onClick={e => onBookSelect(e, index)}
              >
                {selectedIndices.includes(index) ? (
                  <div className={styles.bookOverlay} />
                ) : null}
                {selectedIndices.includes(index) ? (
                  <button
                    className={styles.bookDeleteButton}
                    onClick={e => onBookDeleteButtonClick(e, index)}
                  >
                    X
                  </button>
                ) : null}
                {selectedIndices.includes(index) ? (
                  <button
                    className={styles.bookStatusUpdateButton}
                    onClick={e =>
                      onBookStatusUpdateButtonClick(e, index)
                    }
                  >
                    {listType === "wanted" ? "PURCHASED?" : "WANTED?"}
                  </button>
                ) : null}
                <img
                  src={book.imageURLs[0]}
                  className={styles.bookThumbnail}
                />
              </div>
              <input
                className={styles.bookTitle}
                onChange={e => onBookTitleChange(e, index)}
                value={book.title}
              />
              <input
                className={styles.bookCaption}
                onChange={e => onBookCaptionChange(e, index)}
                value={book.caption}
              />
            </div>
          );
        })}
      </div>
    </div>
  );
};
Handlers
onBookTitleChange & onBookCaptionChange
For title & caption modification, we can just update the entry in the list and forward the newly updated list to Netlify CMS.
import { fromJS } from "immutable";

const BookShelf = props => {
  // Selected list type: wanted, purchased
  const [listType, setListType] = useState("wanted");
  // Indices of all currently selected books
  const [selectedIndices, setSelectedIndices] = useState([]);
  // Current text of the input field
  const [text, setText] = useState("");

  const { value, onChange } = props;
  const books = value.toJS();
  const { wanted, purchased } = books;
  const displayedBooks = listType === "wanted" ? wanted : purchased;

  // ...

  const onTitleChange = (e, index) => {
    const updatedBooks = [...displayedBooks];
    const updatedBook = {
      book: {
        ...updatedBooks[index].book,
        title: e.target.value,
      },
    };
    updatedBooks[index] = updatedBook;
    onChange(
      fromJS({
        ...books,
        [listType]: updatedBooks,
      }),
    );
  };

  const onCaptionChange = (e, index) => {
    const updatedBooks = [...displayedBooks];
    const updatedBook = {
      book: {
        ...updatedBooks[index].book,
        caption: e.target.value,
      },
    };
    updatedBooks[index] = updatedBook;
    onChange(
      fromJS({
        ...books,
        [listType]: updatedBooks,
      }),
    );
  };

  // ...
};
onBookSelect
Whenever we click on a book entry, there will be 3 main cases:
- If no books have been selected yet, the book will be selected
-
If the meta key is held down while clicking:
- If the book has already been selected, it will be deselected.
- Else, the book will be added into the ordered set of selected books
-
If the meta key is not held down while clicking:
- If the book has already been selected, all books will be deselected.
- Else, all previously selected books will now move their positions to be right in front of the book.
import { fromJS } from "immutable";

const BookShelf = props => {
  // Selected list type: wanted, purchased
  const [listType, setListType] = useState("wanted");
  // Indices of all currently selected books
  const [selectedIndices, setSelectedIndices] = useState([]);
  // Current text of the input field
  const [text, setText] = useState("");

  const { value, onChange } = props;
  const books = value.toJS();
  const { wanted, purchased } = books;
  const displayedBooks = listType === "wanted" ? wanted : purchased;

  // ...

  const onBookSelect = (e, index) => {
    if (selectedIndices.length === 0) {
      setSelectedIndices([index]);
    } else if (e.metaKey || e.ctrlKey) {
      if (selectedIndices.includes(index)) {
        setSelectedIndices(selectedIndices.filter(i => i !== index));
      } else {
        setSelectedIndices(
          [...selectedIndices, index].sort((a, b) => a - b),
        );
      }
    } else {
      if (selectedIndices.includes(index)) {
        setSelectedIndices([]);
      } else {
        const indexBook = displayedBooks[index];
        const selectedBooks = displayedBooks.filter((book, i) =>
          selectedIndices.includes(i),
        );
        const preSelectedBooks = displayedBooks.filter(
          (book, i) => i < index && !selectedIndices.includes(i),
        );
        const postSelectedBooks = displayedBooks.filter(
          (book, i) => i > index && !selectedIndices.includes(i),
        );
        const updatedBooks = [
          ...preSelectedBooks,
          ...selectedBooks,
          indexBook,
          ...postSelectedBooks,
        ];
        setSelectedIndices([]);
        onChange(fromJS({ ...books, [listType]: updatedBooks }));
      }
    }
  };

  // ...
};
onBookDeleteButtonClick
Deleting a book entry is quite simple. The only caveat here is that we need to left-shift the indices of selected books being positioned after the deleted book entry.
import { fromJS } from "immutable";

const BookShelf = props => {
  // Selected list type: wanted, purchased
  const [listType, setListType] = useState("wanted");
  // Indices of all currently selected books
  const [selectedIndices, setSelectedIndices] = useState([]);
  // Current text of the input field
  const [text, setText] = useState("");

  const { value, onChange } = props;
  const books = value.toJS();
  const { wanted, purchased } = books;
  const displayedBooks = listType === "wanted" ? wanted : purchased;

  // ...

  const onBookDeleteButtonClick = (e, index) => {
    e.preventDefault();
    e.stopPropagation();
    const updatedBooks = [...displayedBooks];
    updatedBooks.splice(index, 1);
    setSelectedIndices(
      selectedIndices
        .map(i => {
          if (i < index) {
            return i;
          } else if (i === index) {
            return null;
          } else {
            return i - 1;
          }
        })
        .filter(i => i != null),
    );
    onChange(fromJS({ ...books, [listType]: updatedBooks }));
  };

  // ...
};
onBookStatusUpdateButtonClick
Similar to deleting a book entry, we need to remember to left-shift the indices of seleted books that are positioned after the entry with status updated. The updated book entry will be appended at the end of the other list of books.
import { fromJS } from "immutable";

const BookShelf = props => {
  // Selected list type: wanted, purchased
  const [listType, setListType] = useState("wanted");
  // Indices of all currently selected books
  const [selectedIndices, setSelectedIndices] = useState([]);
  // Current text of the input field
  const [text, setText] = useState("");

  const { value, onChange } = props;
  const books = value.toJS();
  const { wanted, purchased } = books;
  const displayedBooks = listType === "wanted" ? wanted : purchased;

  // ...

  const onBookStatusUpdateButtonClick = (e, index) => {
    e.preventDefault();
    e.stopPropagation();
    const updatedBook = displayedBooks[index];
    const updatedBooks = [...displayedBooks];
    const otherType = listType === "wanted" ? "purchased" : "wanted";
    const otherBooks = [...(otherType ? purchased : wanted)];
    otherBooks.push(updatedBook);
    updatedBooks.splice(index, 1);
    setSelectedIndices(
      selectedIndices
        .map(i => {
          if (i < index) {
            return i;
          } else if (i === index) {
            return null;
          } else {
            return i - 1;
          }
        })
        .filter(i => i != null),
    );
    onChange(
      fromJS({
        ...books,
        [listType]: updatedBooks,
        [otherType]: otherBooks,
      }),
    );
  };

  // ...
};
onInputChange
Whenever admin pastes a new book URL into the input, the widget will then scrape the book information from the book page and create a new entry in the currently viewed list of books.
However, there's a major problem here. If we remember, our scraper was implemented in NodeJS since the scraper is not able to work in the browser environment. So in order to let the widget use the scraper, we will need to create an API endpoint for the scraper and let the widget send the API request to that endpoint.
We will elaborate more on how we created that API endpoint in the following section. For now, we will assume the API endpoint being GET /scrape.
import { fromJS } from "immutable";

const BookShelf = props => {
  // Selected list type: wanted, purchased
  const [listType, setListType] = useState("wanted");
  // Indices of all currently selected books
  const [selectedIndices, setSelectedIndices] = useState([]);
  // Current text of the input field
  const [text, setText] = useState("");

  const { value, onChange } = props;
  const books = value.toJS();
  const { wanted, purchased } = books;
  const displayedBooks = listType === "wanted" ? wanted : purchased;

  // ...

  const onInputChange = async e => {
    const bookURL = e.target.value;
    setText(e.target.value);
    const response = await fetch(
      `/scrape?bookURL=${encodeURIComponent(bookURL)}`,
    );
    const body = await response.json();
    const { title, imageURLs, url, caption } = body;
    onChange(
      fromJS({
        ...books,
        [listType]: [
          ...displayedBooks,
          {
            book: {
              title,
              imageURLs,
              url,
              caption,
            },
          },
        ],
      }),
    );
  };

  // ...
};
However, if we recall our initial definition of the data source, the data structure for each book entry is:
export type Book = {
  // Link to the book website being used for book's reference
  url: string;
  // Title of the book
  title: string;
  // Caption of the book including publisher, author, etc.
  caption: string;
  // List of preview images where thumbnail will be the first image
  imageURLs: string[];
  // Width of the thumbnail
  imageWidth: number;
  // Height of the thumbnail
  imageHeight: number;
};
So what we are missing here is the width and height of the thumbnail before creating an entry. But why do we need the width and height of the thumbnail? There are 2 main reasons for this:
- Knowing the width and height of the thumbnail will allow us to display a correctly sized placeholder while the browser is downloading the thumbnail image
- The width and height of the thumbnail will be necessary for us to work on some performance improvements for the application. This will be elaborated more in the upcoming sections.
So to get the width and height of the thumbnail, we will load the image from the widget and extract the information from the onload event.
import { fromJS } from "immutable";

const BookShelf = props => {
  // Selected list type: wanted, purchased
  const [listType, setListType] = useState("wanted");
  // Indices of all currently selected books
  const [selectedIndices, setSelectedIndices] = useState([]);
  // Current text of the input field
  const [text, setText] = useState("");

  const { value, onChange } = props;
  const books = value.toJS();
  const { wanted, purchased } = books;
  const displayedBooks = listType === "wanted" ? wanted : purchased;

  // ...

  const onInputChange = async e => {
    const bookURL = e.target.value;
    setText(e.target.value);
    const response = await fetch(
      `/scrape?bookURL=${encodeURIComponent(bookURL)}`,
    );
    const body = await response.json();
    const { title, imageURLs, url, caption } = body;
    const img = new Image();
    img.onload = function() {
      onChange(
        fromJS({
          ...books,
          [listType]: [
            ...displayedBooks,
            {
              book: {
                title,
                imageURLs,
                url,
                caption,
                imageWidth: this.width,
                imageHeight: this.height,
              },
            },
          ],
        }),
      );
      setText("");
    };
    img.src = imageURLs[0];
  };

  // ...
};
With this, we have finished implementing the CMS for our application. Thanks to Netlify CMS, we are able to modify the data source in a much more flexible and intuitive way without touching the JSON file directly. 🤟
Netlify Functions
According to what we discovered in the previous section, to be able to use our scraper, we need to put it behind an API endpoint. The usual way for us to do this is to build a backend service and create the API endpoint under it. However, the process of setting up and maintaining a backend service with all the concerns of security and scalability in mind is not simple.
Instead, we are gonna create a serverless API endpoint for our use case. For those who are not familiar with the term serverless, it was an idea originated by Amazon.
Serverless is the native architecture of the cloud that enables you to shift more of your operational responsibilities to AWS, increasing your agility and innovation. Serverless allows you to build and run applications and services without thinking about servers. It eliminates infrastructure management tasks such as server or cluster provisioning, patching, operating system maintenance, and capacity provisioning. You can build them for nearly any type of application or backend service, and everything required to run and scale your application with high availability is handled for you.
Serverless enables you to build modern applications with increased agility and lower total cost of ownership. Building serverless applications means that your developers can focus on their core product instead of worrying about managing and operating servers or runtimes, either in the cloud or on-premises. This reduced overhead lets developers reclaim time and energy that can be spent on developing great products which scale and that are reliable.
To support serverless architecture, Amazon came up with an ecosystem of services to support this. One of them is AWS Lambda. AWS Lambda lets you run server code without provisioning or managing servers. You pay only for the compute time you consume. With Lambda, you can run code for virtually any type of application or backend service - all with zero administration. Just upload your code and Lambda takes care of everything required to run and scale your code with high availability.
AWS's serverless Lambda functions open a world of possibilities for running on-demand, server-side code without having to run a dedicated server. However, managing service discovery, configuring API gateways, and coordinating deployments between our app and our serverless functions can quickly become overwhelming. So instead of using AWS Lambda directly, we will use a middleware service known as Netlify Functions provided by Netlify. Netlify Functions lets you deploy serverless Lambda functions without an AWS account, and with function management handled directly within Netlify. Our serverless functions are version-controlled, built, and deployed along with the rest of our Netlify site.
The supported languages for function implementation at the moment are Go and NodeJS. This is perfect for us since our scraper was written in NodeJS. 🙌 Implementing a function is fairly straightforward. Each JavaScript file to be deployed as a serverless Lambda function must export a handler method with the following syntax:
exports.handler = async (event, context) => {
  // your server-side functionality
}
When you call a serverless function’s endpoint, the handler receives an event object containing information about the request:
{
  "path": "Path parameter",
  "httpMethod": "Incoming request's method name"
  "headers": {Incoming request headers}
  "queryStringParameters": {query string parameters }
  "body": "A JSON string of the request payload."
  "isBase64Encoded": "A boolean flag to indicate if the applicable request payload is Base64-encode"
}
Hence, our scraper function can be easily implemented as:
./functions/scrape.js
exports.handler = async (event, context) => {
  const { httpMethod, queryStringParameters } = event;

  // Only allow GET
  if (httpMethod !== "GET") {
    return { statusCode: 405, body: "Method Not Allowed" };
  }

  // Missing required query `bookURL`
  const { bookURL } = queryStringParameters;
  if (bookURL == null) {
    return { statusCode: 400, body: "Missing query `bookURL`" };
  }

  try {
    const scrapedData = await scrape(bookURL);

    return {
      statusCode: 200,
      body: JSON.stringify({
        url: bookURL,
        ...scrapedData,
      }),
      headers: {
        "Content-Type": "application/json",
      },
    };
  } catch (error) {
    return {
      statusCode: 500,
      body: "Something wrong happened",
    };
  }
};
We will then also need to update our widget to send the API requests for scraping to the endpoint of this new Netlify function.
import { fromJS } from "immutable";

const BookShelf = props => {
  // ...

  const onInputChange = async e => {
    const bookURL = e.target.value;
    setText(e.target.value);
    const response = await fetch(
      `/.netlify/functions/scrape?bookURL=${encodeURIComponent(bookURL)}`,
    );
    // ...
  };

  // ...
};
For functions deployment, we just need to simply tell Netlify the source folder storing all of our functions. Netlify will then automatically deploy all of these functions for us. 👊
[build]
  publish = "./build"
  functions = "./functions"
With this, our serverless APIs are ready to go and our CMS is fully completed! 🎉
App UI
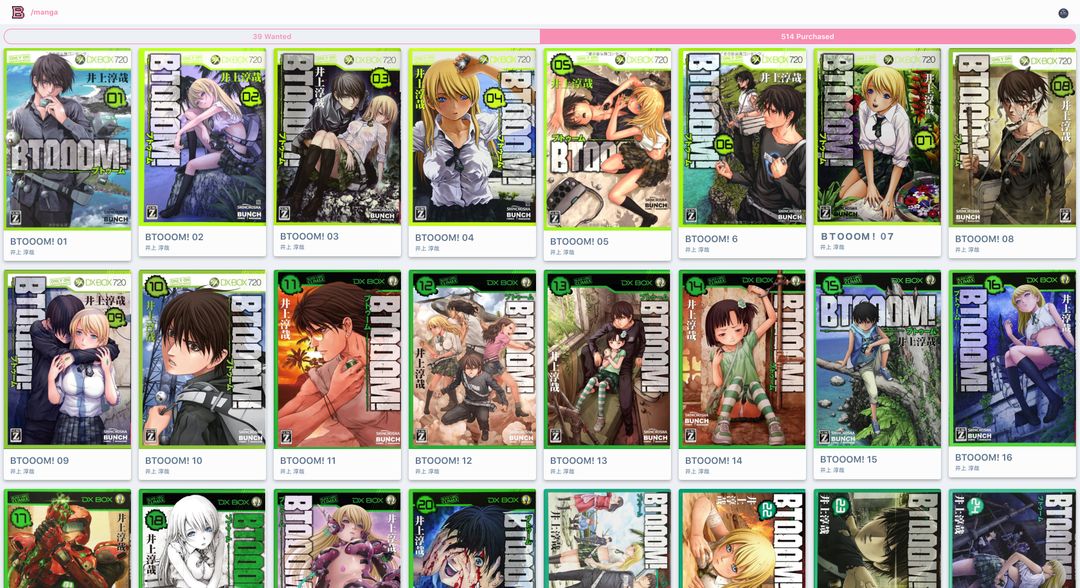
After setting up our app's data source and implementing the CMS for editing it, our last step is to build the main application itself. Our main app layout will look similar to the layout of the CMS.
- Each book entry will be represented by a card with its title, caption and thumbnail displayed
- Number of cards for each row in the grid will vary depending on the width of the viewport
- Users can switch between light & dark theme based on their preferences
- Tab bar at the top allows user to switch between the list of wanted & purchased books
This UI layout can be easily built with React. For the grid system of cards, we initially used Flexbox to achieve this.
./web/components/Page.tsx
import React, { ReactElement } from "react";
import { Route, Switch } from "wouter";

import CardBookList from "../CardBookList";
import Tabs from "../Tabs";

import booksJSON from "../../json/books.json";

export default function PageManga(): ReactElement<void> {
  const { books } = booksJSON;
  const { wanted, purchased } = books;

  return (
    <Fragment>
      <Tabs
        tabs={[
          {
            title: `${wanted.length} Wanted`,
            url: "/wanted",
          },
          {
            title: `${purchased.length} Purchased`,
            url: "/purchased",
          },
        ]}
      />
      <Switch>
        <Route path="/wanted">
          <CardBookList books={wanted} />
        </Route>
        <Route path="/purchased">
          <CardBookList books={purchased} />
        </Route>
      </Switch>
    </Fragment>
  );
}
./web/components/Card.tsx
import styles from "./Card.css";

import React, { ReactElement } from "react";

type Props = {
  book: Book;
  className?: string;
};

export default function Card(props: Props): ReactElement<Props> {
  const { className = "", book } = props;

  return (
    <figure className={`${className} ${styles.card}`}>
      <div
        className={styles.thumbnailWrapper}
        style={{
          paddingTop: `${(book.imageHeight / book.imageWidth) * 100}%`,
        }}
      >
        <img className={styles.thumbnail} src={book.imageURLs[0]} />
      </div>
      <figcaption className={styles.content}>
        <a href={book.url} className={styles.title}>
          {book.title}
        </a>
        <p className={styles.caption}>{book.caption}</p>
      </figcaption>
    </figure>
  );
}
./web/components/CardGrid.tsx
import styles from "./CardGrid.css";

import React, { ReactElement } from "react";

import Card from "../Card";

type Props = {
  books: { book: Book }[];
};

export default function CardGrid(
  props: Props,
): ReactElement<Props> {
  const { books } = props;

  return (
    <div className={styles.grid}>
      {books.map(({ book }, index) => (
        <div className={styles.itemWrapper} key={index}>
          <Card className={styles.item} book={book} />
        </div>
      ))}
    </div>
  );
}
./web/components/CardGrid.css
.list {
  display: flex;
  flex-flow: row wrap;
  align-items: flex-start;
}

.itemWrapper {
  flex: none;
  padding: 8px;
  width: 50%;
}

@media all and (min-width: 992px) {
  .itemWrapper {
    width: 25%;
  }
}

@media all and (min-width: 1200px) {
  .itemWrapper {
    width: 20%;
  }
}

@media all and (min-width: 2000px) {
  .itemWrapper {
    width: 12.5%;
  }
}

.item {
  height: 100%;
}
Virtual List
Although the UI implementation of the app is completed, we realized that there was another major problem. 😩 When the book library grows larger with more than hundreds of books, the app will then be required to render more than hundreds of cards consequently. This created heavy stress on the app's rendering performance and users will encounter scroll jank issues as they are browsing the library.
So how can we avoid this? The solution here is to create a virtual grid where only the cards visible in the current viewport will be rendered. The grid will then keep calculating to decide which cards will be rendered as the user is scrolling through the app. For React, we will use the popular library react-virtualized to build the virtual grid.
Since we are using react-virtualized, we will also need to configure the grid layout with the library instead of using Flexbox like before. All cards will be rendered under the List component. Since the scroll container for our application is the window itself, we will also need to wrap the List component under the helper component WindowScroller to tell react-virtualized the scroll container is not the list component itself.
import styles from "./CardGrid.css";

import React, { ReactElement } from "react";
import { WindowScroller, List } from "react-virtualized";

type Props = {
  books: { book: Book }[];
};

export default function CardGrid(
  props: Props,
): ReactElement<Props> {
  const { books } = props;

  return (
    <div className={styles.grid}>
      <WindowScroller>
        {({ height, scrollTop, registerChild }) => (
          <List
            ref={registerChild}
            height={height}
            scrollTop={scrollTop}
            autoHeight
            width={...}
            rowCount={...}
            rowHeight={...}
            rowRenderer={...}
          />
        )}
      </WindowScroller>
    </div>
  );
}
width
For the width of the list, it will be the width of the window viewport excluding the scrollbar's width.
import styles from "./CardGrid.css";

import React, { ReactElement, useState, useEffect } from "react";
import { WindowScroller, List } from "react-virtualized";

type Props = {
  books: { book: Book }[];
};

const verticalScrollbarWidth = (function getScrollbarWidth(): number {
  if (typeof window === "undefined") {
    return 0;
  }
  const div = document.createElement("div");
  div.style.overflow = "scroll";
  div.style.visibility = "hidden";
  div.style.position = "absolute";
  div.style.width = "100px";
  div.style.height = "100px";
  document.body.appendChild(div);
  const scrollbarWidth = div.offsetWidth - div.clientWidth;
  document.body.removeChild(div);
  return scrollbarWidth;
})();


export default function CardGrid(
  props: Props,
): ReactElement<Props> {
  const { books } = props;

  const [windowWidth, setWindowWidth] = useState<number>(
    window.innerWidth,
  );

  useEffect((): (() => void) => {
    function handleResize(): void {
      setWindowWidth(window.innerWidth);
      if (listRef.current != null) {
        listRef.current.recomputeRowHeights();
      }
    }
    window.addEventListener("resize", handleResize);
    return (): void =>
      window.removeEventListener("resize", handleResize);
  }, []);

  return (
    <div className={styles.grid}>
      <WindowScroller>
        {({ height, scrollTop, registerChild }) => (
          <List
            ref={registerChild}
            height={height}
            scrollTop={scrollTop}
            autoHeight
            width={windowWidth - verticalScrollbarWidth}
            rowCount={...}
            rowHeight={...}
            rowRenderer={...}
          />
        )}
      </WindowScroller>
    </div>
  );
}
rowCount
The number of rows in the list will depend on how many items we are rendering per row. As we recall, the number of items to be rendered for each row is based on the current viewport width of the browser. Hence, this can be easily computed since we have already managed to get the window's width above.
// ...

export default function CardGrid(
  props: Props,
): ReactElement<Props> {
  const { books } = props;

  const [windowWidth, setWindowWidth] = useState<number>(
    window.innerWidth,
  );

  // ...

  let numItemsPerRow = 2;
  if (windowWidth > 2000) {
    numItemsPerRow = 8;
  } else if (windowWidth >= 1200) {
    numItemsPerRow = 5;
  } else if (windowWidth >= 992) {
    numItemsPerRow = 4;
  }

  return (
    <div className={styles.grid}>
      <WindowScroller>
        {({ height, scrollTop, registerChild }) => (
          <List
            ref={registerChild}
            height={height}
            scrollTop={scrollTop}
            autoHeight
            width={windowWidth - verticalScrollbarWidth}
            rowCount={Math.ceil(
              books.length / numItemsPerRow,
            )}
            rowHeight={...}
            rowRenderer={...}
          />
        )}
      </WindowScroller>
    </div>
  );
}
rowRenderer
rowRenderer will tell the List component how to render for each row by returning the corresponding React element. Given the row index, depending on the number of items rendered per row, we can filter out the book entries to be rendered.
// ...

export default function CardGrid(
  props: Props,
): ReactElement<Props> {
  const { books } = props;

  // ...

  const renderRow = ({
    index: rowIndex,
    key,
    style,
  }) => {
    const filteredBooks = books.filter(
      (_, i) => Math.floor(i / numItemsPerRow) === rowIndex,
    );
    return (
      <div style={style} key={key} className={styles.row}>
        {filteredBooks.map(({ book }) => (
          <div
            className={styles.itemWrapper}
            style={{ width: `${100 / numItemsPerRow}%` }}
            key={book.url}
          >
            <Card
              className={styles.item}
              book={book}
            />
          </div>
        ))}
      </div>
    );
  };

  return (
    <div className={styles.grid}>
      <WindowScroller>
        {({ height, scrollTop, registerChild }) => (
          <List
            ref={registerChild}
            height={height}
            scrollTop={scrollTop}
            autoHeight
            width={windowWidth - verticalScrollbarWidth}
            rowCount={Math.ceil(
              books.length / numItemsPerRow,
            )}
            rowRenderer={renderRow}
            rowHeight={...}
          />
        )}
      </WindowScroller>
    </div>
  );
}
rowHeight
rowHeight prop will tell the List component the dynamic height for each row inside the list. This is necessary for the List component to calculate correctly whether a row should be rendered with the viewport's current position.
// ...

export default function CardGrid(props: Props): ReactElement<Props> {
  const { books } = props;

  // ...

  const getRowHeight = ({ index: rowIndex }) => {
    const filteredBooks = books.filter(
      (_, i) => Math.floor(i / numItemsPerRow) === rowIndex,
    );
    const maxRatio = filteredBooks.reduce(
      (maxRatio, { book }) =>
        Math.max(maxRatio, book.imageHeight / book.imageWidth),
      0,
    );
    return (
      ((windowWidth - verticalScrollbarWidth) / numItemsPerRow) *
      maxRatio
    );
  };

  return (
    <div className={styles.grid}>
      <WindowScroller>
        {({ height, scrollTop, registerChild }) => (
          <List
            ref={registerChild}
            height={height}
            scrollTop={scrollTop}
            autoHeight
            width={windowWidth - verticalScrollbarWidth}
            rowCount={Math.ceil(books.length / numItemsPerRow)}
            rowRenderer={renderRow}
            rowHeight={getRowHeight}
          />
        )}
      </WindowScroller>
    </div>
  );
}
With this, the construction of our virtual list is completed and our application is ready to go! The UI is the same as before but there's now a significant improvement in the rendering performance and the janking issue while scrolling was long gone. 👏
Final Thoughts
This concluded the case study of my virtual bookshelf app. It's now time for me to start filling up the library with all of my books 🤩. The journey of creating this app has been super enjoyable and greatly improved my knowledge on various aspects of web development. With the app, the management of my books collection has been much more organized while it also helps me planning my next purchase more easily. The full source code of the app can be found under:
https://github.com/imouto1994/fumino
At this point, the app is still far from being considered as completed and I plan to add more helpful features to it in the future such as:
- Search & filter by title, author or circle/publisher
- Sort by title, author or circle/publisher
- Suggestion for wishlist according to purchased mangas
But until the next update comes, see you when I see you! ✌️


